Provide Sustainable Electric Bikes For Everyone
Malesuada fames ac turpis egestas. Interdum velit laoreet id donec. Eu tincidunt tortor aliquam nulla facilisi cras.
If you’ve ever looked at a wheel listing and felt like it was written in a secret code (QR, 12×142, Boost, HG, XD…), you’re not alone.
Table of Contents
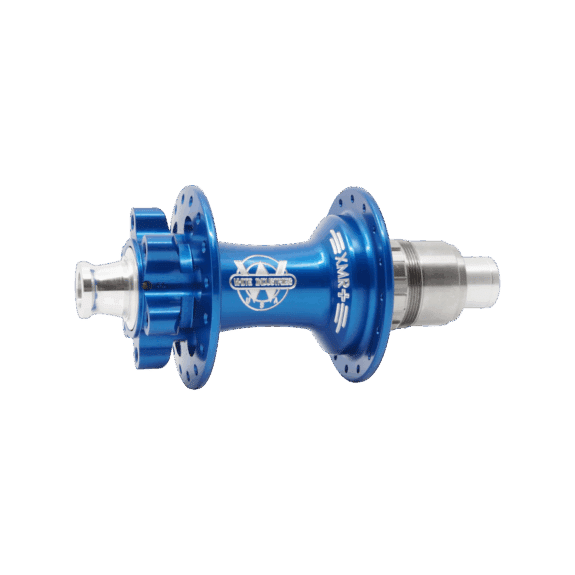
A bicycle wheel hub is the part in the center of your wheel. It’s what attaches the wheel to your bike, lets it spin smoothly, and (on the rear wheel) transfers your pedaling power into forward motion.
This guide breaks hubs down in plain English, then gives you a simple checklist you can use before you buy a replacement wheel, upgrade a wheelset, or talk to a bike shop.
Think of the hub as the wheel’s “center bearing assembly.”
If your hub is the wrong standard for your bike, the wheel won’t fit. If your hub bearings are worn out, the wheel might feel rough, noisy, or wobbly.
You don’t need to memorize every part name. But knowing the big pieces helps you diagnose problems and avoid buying the wrong thing.
Hub shell: the outer body of the hub.
Flanges: the round “plates” on the hub shell where the spokes attach.
Axle: the rod that runs through the hub and anchors the wheel to your bike.
Bearings: the parts that let the hub rotate smoothly around the axle.
Seals/end caps: keep dirt and water out, and help the hub interface with your frame/fork.
Freehub (rear hub only): the part your cassette slides onto. It contains the mechanism that drives the wheel when you pedal and lets it spin when you coast. BikeRadar’s guide, Freehubs explained, has a clear overview if you want a deeper visual explanation.
Front hubs are simpler. They mostly just do “spin smoothly and hold the wheel on the bike.”
Rear hubs do that too, plus they handle your drivetrain:
You’ll also hear people talk about rear hub engagement. That’s how quickly the freehub “catches” when you start pedaling again. It matters more for technical off-road riding than for casual road or commuting, so don’t let it distract you from the big compatibility stuff.
Most beginner mistakes come from buying a hub (or wheel) that doesn’t match the bike.
You can ignore a lot of marketing details if you match these five things.
This is the big one.
If your bike is thru-axle, a QR wheel usually won’t work (and vice versa) without special adapters, and those aren’t universal.
For a quick overview of how modern axle standards and hub spacing fit together, see GearJunkie’s bicycle hub standards explained.
Pro Tip: Your frame/fork specs are the source of truth. Look for a sticker on the fork leg or inside the rear triangle, check the owner’s manual, or search the bike model online. Don’t guess from photos.
You’ll often see this as a number like 12×142.
Common examples beginners run into:
If the spacing doesn’t match your frame/fork, the wheel will not fit correctly.
If you have rim brakes, you need a wheel that has a braking surface.
If you have disc brakes, the hub must support your rotor mount standard.
Two common rotor mounting systems:
If you’re unsure which you have, look at your rotor: six visible bolts means 6-bolt; a lockring means Center Lock.
This is where “freehub standards” show up.
You don’t have to learn every standard. You just need to know: your cassette must match your freehub body.
If you’re shopping for a wheelset, the simplest move is to:
BikeRadar’s “Freehubs explained” page (linked earlier) is a good starting point.
These two get mixed up constantly.
If you’re not sure:
If your bike is newer and has 8+ speeds, it’s more likely to be a cassette/freehub setup.
Bearings are the wear items inside the hub. When they’re healthy, your wheel spins quietly and smoothly. When they’re not, you’ll feel it.
Two common styles:
Sealed cartridge bearings
Cup-and-cone bearings
If you want the most trustworthy, step-by-step explanation of cup-and-cone service, Park Tool’s guide is the standard reference: Hub overhaul and adjustment.
⚠️ Warning: A little side-to-side play can be normal off the bike for some quick release hubs. Park Tool explains that quick release clamping force can remove that play once the wheel is installed, so don’t overtighten bearings just to make everything feel “perfect” in your hands.
If something feels wrong, you can do a quick check without tools.
What it can mean:
What to do:
What it can mean:
What to do:
This is often normal.
That clicking usually comes from the freehub’s engagement mechanism. Different hubs are louder than others.
What’s not normal is a sudden change in sound (much louder, much quieter, or inconsistent) paired with skipping under load.
This might be a hub problem, but often it’s a drivetrain problem.
Possible causes:
If you want a drivetrain refresher, Aptizon has a clear guide on rear shifting parts: The Ultimate Guide to Rear Derailleurs.
If you only take one thing from this article, take this.
If you’re shopping for a wheelset rather than a bare hub, browsing a few examples can help you see how these specs are listed. Aptizon’s Shop is one place to compare spec callouts.
If you want to go one level deeper into hub manufacturing and where hubs come from, Aptizon also has an industry overview: China’s Bicycle Hub Exports (2015 to 2025).